
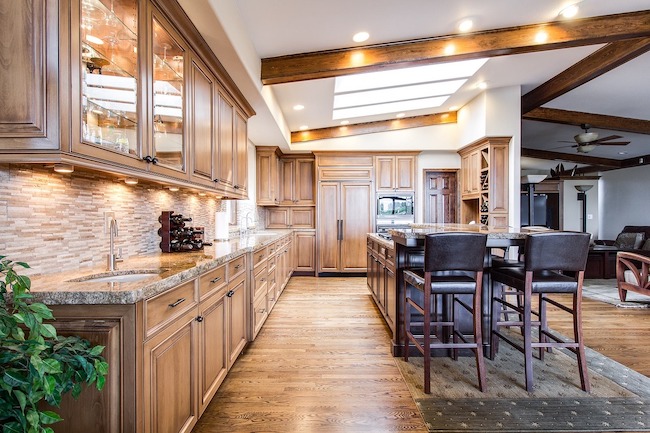
What Height Should Kitchen Wall Units Be?
When it comes to designing your kitchen, finding the perfect balance between style and functionality is key.
One crucial element to consider is the height of your kitchen wall units.
Getting this measurement right is essential for creating a functional and aesthetically pleasing space.
After all, you want your wall units to provide convenient storage without feeling too low or too high.
In this post, we'll delve into the world of kitchen design and explore the optimal height for kitchen wall units.
From practical considerations to design principles, we'll guide you through the process of determining the ideal height for your kitchen wall units.
So let's raise the bar on kitchen design and find the perfect fit!
Click here to see our range of DIY Kitchens Online from JMT Trade...
What Height Should Kitchen Wall Units Be?
The height of kitchen wall units is an important factor to consider when designing your kitchen.
While there is no one-size-fits-all answer, there are some general guidelines to help you determine the ideal height for your kitchen wall units.
The standard height for kitchen wall units is typically around 600mm to 720mm (24 to 30 inches) from the countertop.
This allows for easy access to the units while providing sufficient space for countertop appliances and workspace.
Here are a few considerations to keep in mind:
- Ergonomics and Reach: Consider the ergonomics of your kitchen and the average height of the people using it. Ideally, the wall units should be within reach without requiring excessive stretching or bending. The height should be comfortable for the majority of users, ensuring convenient access to items stored in the units.
- Ceiling Height: Take into account the overall height of your kitchen, including the ceiling height. If you have high ceilings, you may have the flexibility to install taller wall units for increased storage space. Conversely, if you have lower ceilings, you'll want to avoid units that make the space feel cramped or overwhelming.
- Design Proportions: Consider the proportions and visual balance of your kitchen. The height of the wall units should complement other elements, such as base cabinets, appliances, and the overall layout. Aim for a cohesive and harmonious design where the wall units blend seamlessly with the rest of the kitchen.
- Personal Preference: Ultimately, the height of your kitchen wall units should reflect your personal preference and lifestyle. Take into account your specific storage needs, the items you plan to store in the units, and how you want your kitchen to function on a day-to-day basis.
Remember, these are general guidelines, and it's important to adapt them to your specific kitchen space and requirements.
Consulting with a kitchen designer or professional can provide valuable insights and help you find the perfect height for your kitchen wall units.
By considering ergonomics, design proportions, and your personal preferences, you can achieve a functional and visually appealing kitchen that suits your needs.
How Much Gap Between Kitchen Worktops and Kitchen Wall Units?
When it comes to the gap between kitchen worktops and wall units, there is no fixed rule as it can vary depending on personal preference and the overall design of your kitchen. However, here are some general considerations to help you determine the appropriate gap:
- Functionality: Leave enough space between the worktop and wall units to ensure practicality and ease of use. This allows you to work comfortably on the countertop without any obstructions from the wall units. A gap of around 400mm to 600mm (16 to 24 inches) is often recommended.
- Aesthetics and Design: Consider the visual aspect and balance of your kitchen. The size of the gap can impact the overall aesthetics of the space. A smaller gap can create a sleek and streamlined look, while a larger gap can give a more open and airy feel.
- Splashback Protection: If you have a splashback installed between the worktop and wall units, consider leaving a small gap to allow for easy cleaning and maintenance. This gap can prevent water or food spills from seeping into the junction between the worktop and wall units.
- Electrical Outlets: If there are electrical outlets or switches positioned on the wall just above the worktop, make sure to leave enough clearance for easy access and use. Consider the height and positioning of these elements when determining the gap.
Remember, these are general guidelines, and it's important to adapt them based on your specific kitchen layout and requirements.
Consider factors such as your personal preference, the size of your wall units, the height of your worktop, and any other specific needs you may have.
Taking into account both functionality and aesthetics will help you achieve the ideal gap between your kitchen worktops and wall units for a practical and visually pleasing kitchen design.
How to Install Wall-Mounted Kitchen Units
Installing wall-mounted kitchen units can be a rewarding DIY project that enhances the functionality and appearance of your kitchen.
Here's a step-by-step guide to help you through the process:
- Gather the Necessary Tools: Before you begin, make sure you have all the necessary tools and materials, including a drill, screws, wall plugs, a spirit level, measuring tape, and a screwdriver.
- Plan and Mark the Position: Start by planning the placement of your wall units. Measure and mark the positions on the wall where you want to install them. Use a spirit level to ensure the markings are level and accurate.
- Locate Wall Studs: If possible, locate and mark the position of wall studs behind the drywall or plaster. Wall studs provide stronger support for attaching the units. You can use a stud finder for this purpose.
- Drill Pilot Holes: Using a drill, create pilot holes at the marked positions. Ensure the drill bit size matches the size of the wall plugs you plan to use.
- Insert Wall Plugs: Insert wall plugs into the pilot holes. Wall plugs provide a secure anchor for the screws that will hold the units in place. Gently tap the plugs into the holes until they are flush with the wall surface.
- Mount the Units: With the help of an assistant, carefully lift the first wall unit and align it with the pilot holes and wall plugs. Insert the screws through the unit's mounting brackets or pre-drilled holes into the wall plugs. Tighten the screws until the unit is securely attached to the wall. Repeat this process for each unit.
- Check for Level: Use a spirit level to ensure that each unit is level both horizontally and vertically. Adjust the position as necessary by loosening the screws and making minor adjustments.
- Secure Adjacent Units: If you have multiple units that will be adjacent to each other, use screws to secure them together. This helps to ensure a seamless appearance and stability.
- Install Shelves and Doors: Once the units are securely mounted, install any shelves or doors according to the manufacturer's instructions.
- Finishing Touches: Finally, check that all units are securely fastened, adjust any alignment if needed, and ensure all doors and drawers open and close smoothly.
Remember, if you are uncertain about any step of the installation process, it is always advisable to consult a professional or seek assistance from an experienced DIY'er.
Proper installation ensures the safety and longevity of your wall-mounted kitchen units, so take your time, follow the instructions, and enjoy the satisfaction of a job well done.
Some Tips From an Expert Kitchen Fitter
As an expert kitchen fitter, I'm delighted to share some valuable tips to help you with your kitchen installation project:
- Measurements Matter: Accurate measurements are crucial for a successful kitchen installation. Take precise measurements of your space, including walls, windows, and doorways. Double-check your measurements to ensure the units will fit properly.
- Plan Your Layout: Before starting the installation, carefully plan the layout of your kitchen units. Consider the workflow, accessibility, and functionality of the space. Take into account factors such as the placement of appliances, the location of electrical outlets, and the flow between work areas.
- Invest in Quality Fixings: Choose high-quality fixings, such as screws and wall plugs, for mounting your kitchen units. This ensures stability and durability. It's worth investing in sturdy fixings to support the weight of the units and prevent any accidents or damage in the future.
- Work with a Level: Use a spirit level throughout the installation process to ensure that your units are level and plumb. This step is essential for achieving a professional-looking finish. Adjust as needed to maintain straight and even lines.
- Secure Wall Units Properly: When installing wall units, make sure they are securely fastened to the wall. Use wall plugs and screws to provide robust support. For added safety, consider attaching units to wall studs whenever possible.
- Allow for Proper Ventilation: When installing appliances such as ovens, microwaves, or extractor hoods, ensure there is adequate ventilation. Follow the manufacturer's guidelines to ensure proper airflow, which is essential for the longevity and efficient operation of the appliances.
- Take Care with Plumbing and Electrical Connections: If you are incorporating sinks, faucets, or electrical outlets into your kitchen units, exercise caution when making plumbing and electrical connections. If you're not confident in your abilities, it's best to consult a qualified professional to ensure safe and proper installation.
- Pay Attention to Detail: Take the time to align doors, drawers, and handles accurately. These finishing touches can greatly enhance the overall appearance of your kitchen. A consistent and well-aligned design gives a polished and cohesive look to the space.
Remember, safety should always be a priority during any installation project.
If you're uncertain about any aspect of the installation process, it's wise to seek professional assistance.
They can provide expert guidance, ensure compliance with regulations, and help you achieve the best results for your kitchen installation.
Can You Buy Fitted Kitchens Online?
Yes you can buy fitted kitchens online and you are in the perfect place to do so!
Here are JMT Trade we have been manufacturing kitchens in-house for over forty years.
You can use our website to buy your own custom designed, dream kitchen.
Or quality is second to none, we pride ourselves in our customer service and our prices are kept low as you are buying direct from the manufacturer with no middle man bumping up the price.
With ranges from Zola, Strada, Aldana all the way up to the Netherby range which is our budget friendly premium range.
Our handcrafted kitchens can be customised to fit any shape or size of room, with gloss or matt finish, you have a hundred different colour schemes to choose from.
Check out this link to see our range of complete kitchens for sale online UK…
Final Notes On The Recommended Height For Kitchen Wall Units
Determining the ideal height of kitchen wall units involves a variety of considerations.
The standard height is approximately 600mm to 720mm (24 to 30 inches) from the countertop, enabling easy access and sufficient workspace.
Factors to consider include ergonomics, with the units within easy reach, and the ceiling height, which can dictate whether taller units can be installed.
The overall design proportions should result in the height of the wall units harmonising with other kitchen elements, and personal preferences should be taken into account to cater to individual storage needs and lifestyle.
Always remember these are guidelines and might need to be adapted to your specific kitchen.
Consulting with a professional can help determine the perfect height for your kitchen wall units, blending functionality with visual appeal.
